working with plasticard
~ v1.0 - last updated 10/10/14 ~
This article outlines the methods I use when working with plasticard (sheet styrene) to achieve the distinctive Eldar aesthetics in my scratchbuild and conversion projects.This guide is © Andrew Hicks; please do not reproduce this article without my permission, but feel free to link to it if you wish.
Introduction
Eldar vehicles are characterised by curving edges and panel lines. Recreating the smooth surfaces and curved edges can be challenging, but I've outlined some of my techniques here in case they prove useful.
Panel lines
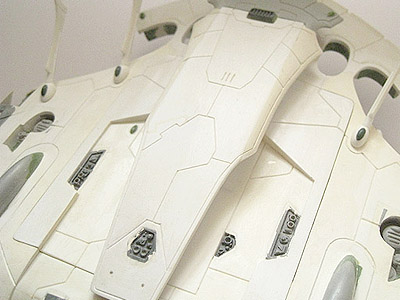
By far and away the most frequent question I get asked is "how do you create those panel lines?". It's a slightly bemusing question as the method is really very simple. I've outlined it in the YouTube video embedded below.
In essence, the method is essentially just progressively etching the surface of the plasticard with the point of a half-moon shaped needle file, gradually applying more pressure and repeatedly going over the same path several times. This widens and deepens the groove, due to the tapered shape of the point of the needle file.
Creating curved lines
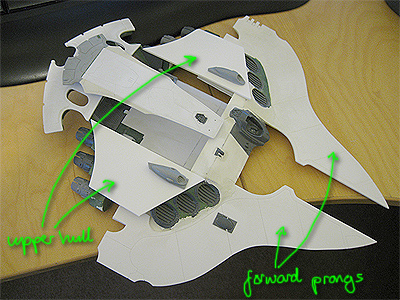
The gentle curving lines of the Eldar vehicles might look difficult to replicate, but it's not as challenging as it might seem at first glance. The Pegasus is my most ambitious project and it is almost entirely scratchbuilt. Although it looks complex, it mostly comprises of flat pieces of plasticard, glued together at different angles with White Milliput used to fill in gaps and create transitions from one section to another.
This is best illustrated by the image to the right. You can see that the forward prongs of the Pegasus are each made from a single large piece of plasticard, as are the sections of the upper hull to either side of the exposed troop compartment. The gap between them and around each set of triple air intakes was filled with Milliput and then sanded and filed to make a smooth, continuous surface.
The challenge is creating the component pieces and getting the shape that you want. Really this is just a question of practice unfortunately. The technique is quite simple - trace out the shape that you're after on the surface of the plasticard, using a pencil. Once you're happy with the template, carefully trace over the pencil marks with your craft knife, applying light pressure and moving slowly along the curve. You don't want to press too hard at this point, or you will risk slipping and cutting into the plasticard in the wrong place. Try to be as accurate as possible. Once this has been done, repeat the process - each time should be easier as the knife should naturally want to follow the path, even when it's very shallow. Once you've done this a few times, the plasticard should be scored deeply enough to snap the piece away by gently flexing it along the cut. You can then tidy up the edge using a file and/or a fine grade sandpaper.
Construction with plasticard
Plasticard responds very well to polystyrene cement (the standard plastic glue the GW sells and massively overcharges for). Thicker pieces of plasticard can also be pinned using a pin vice drill and some lengths of brass rod. This is useful for large pieces that will be taking a reasonable amount of weight. A lot of the internal structure of the Pegasus has been pinned and also braced with other pieces of styrene (completely hidden from view). For large projects it's very important to make sure that the structure is self-supporting. The underside of the Pegasus also takes a lot of its weight, as it has multiple layers of plasticard that build up the detail whilst simultaneously bracing it.
comments powered by Disqus