a guide to magnetising eldar vehicles
~ v2.2 - last updated 13/05/17 ~
This article outlines the methods I use on my Eldar vehicles, Wraithlords, War Walkers and weapon platforms to give them swappable weapons. The methods described here can be easily applied to models from other races and game systems.My original article was posted on Librarium Online; this has since been superseded by this new version, which includes a much more elegant use of magnets for the weapons for Wraithlords, War Walkers and Guardian Heavy Weapon platforms that eliminates the need for pinning.
This guide is © Andrew Hicks; please do not reproduce this article without my permission, but feel free to link to it if you wish.
Introduction
Nowadays all of the Eldar vehicles ship with an extra sprue that has all five of the Eldar heavy weapon options - Starcannon, Shuriken Cannon, Bright Lance, Scatter Laser and Eldar Missile Launcher. This sprue can also be bought individually from the Games Workshop online store. The Wave Serpent kit comes with two of these sprues.
These weapons use a rod/hole mounting system; the weapons that come with the War Walker, Wraithlord and Guardian Heavy Weapon platform use a tab/slot mounting system. Both of these types of weapon can be magnetised to allow them to switched around as need be. This allows you to field any weapon combination on any vehicle without the need for buying potentially dozens of the same kit. These methods can also be used for other things such as vehicle upgrades, interchangeable turrets and magnetic flying bases. These other options will be covered briefly at the end of the article.
Magnetising Eldar skimmer weapons
Turret weapons
The first thing you'll need (obviously) is an unassembled Falcon, Wave Serpent or Vyper. The second thing that you'll need is some magnets! I mostly use N45 (this is a grade of their strength) gold-plated (the plating material is irrelevant really) Neodymium rare-earth magnets. For the turret weapons, I would recommend getting 3mm-diameter, 0.5mm-thick disc magnets. This combination of thickness and height makes them look reasonably inconspicuous whilst still providing enough attraction to hold the weapons in place. The diameter is also perfect for mounting virtually seamlessly on the Falcon and Wave Serpent turrets. I purchased all of my magnets through eBay, but there are other online stores out there that supply specialist mangets such as these. Now that you know what you're looking for you should be able to find them without too much trouble. For magnets of this size you should be able to purchase them for ~9 pence each, making buying 50 or so a viable (and sensible) option.
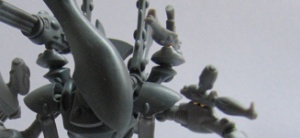
Let's start with the Falcon's turret. Assemble this as normal - I used to glue the Pulse Laser in place, but have since magnetised these as well (using a 3x2mm magnet to provide sufficient attraction to stop the weapon from rotating downwards under gravity, as the long barrel moves the centre of mass quite far forward from the mounting point). The Pulse Laser comes on the end of a rod that passes through the turret - where this emerges on the turret's left side is where the optional heavy weapon is attached. Remove the thinnest end of the rod using a pair of wire clippers or a craft knife. Now use superglue to attach one of the magnets to the mount. These magnets are fiddly but here's a tip for gluing them - use the butt-end of a metal needle file to pick it up, dab a small blob of superglue on the magnet and then use the file to put it in place. Wait for the glue to dry a little and then just pull the file away, leaving the magnet behind, glued in place with precision. It also helps to mark one side of each pair of magnets with a permanent pen to remind you which side to stick down. If you're going to magnetise several vehicles, bear in mind that you'll want to be consistent with which side of the magnets you use so that you can swap weapons between the vehicles.
For the Wave Serpent turret the procedure is pretty much the same as for the Falcon. Make sure to glue the plastic rod in place this time; the magnets allow for easy (albeit, independent) rotation of the weapons so there is no need for the rod itself to rotate in the turret. Cut off the ends of the rod, attach magnets to each side and you're good to go. The end result can be seen in Figure 9.
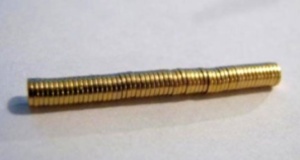
Now the weapons themselves. There's a minor difficulty here, because GW elected to only put one left- and one right-hand weapon guard/casing on the heavy weapon sprue. Since you only need the left-hand guard for the Falcon, this means that you can either a) choose one weapon to fully construct from the five on the sprue, b) use additional magnets to attach the weapon guard, c) buy some spare weapon guards from eBay or your favourite bitz merchant, or d) forget about the weapon covers altogether. Whatever you choose, attach a magnet to your chosen weapon(s) over the hole where the rod would normally pass through. The results should look like the top Bright Lance in Figure 3 (the one below it shows what I mean by the "weapon guard/casing", which makes the weapon look a bit prettier).
Curiously, the weapon guard does not exactly match the guard that is moulded on to the Pulse Laser, nor the guard that comes with the original Scatter Laser on the Falcon sprues (the weapon itself is also subtly different to the new one on the heavy weapon sprue). It doesn't really matter though, because you can barely tell the difference.
Eldar skimmer under-hull weapons
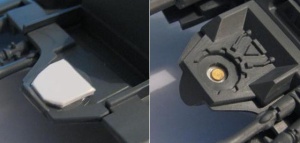
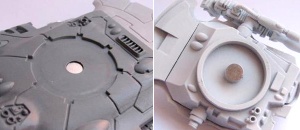
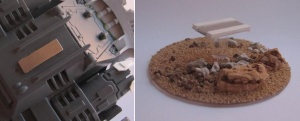
Now for the under-hull weapon options. The Falcon only comes with the standard twin-linked Shuriken Catapults, however the Wave Serpent and Fire Prism kits come with a Shuriken Cannon, so it pays to be able to swap these around. Before you've fully assembled your skimmer, glue a piece of plasticard (a.k.a. "sheet styrene") inside the hull across the round hole where the weapon mount usually goes (this sits underneath the pilot's cockpit). It should look roughly like the left half of Figure 4. You can then turn the model over and use the butt-end of a file to glue a magnet in the centre (or do this first and glue the plasticard in place afterwards) - the result should look like the right-hand side of Figure 4.
Now, take the shuriken catapults/cannon and glue them to the mount with the "X" shaped piece at the top (again, this is personal preference - you can leave them to rotate up and down on the mount if you like). Remove the "X" using wire clippers or a craft knife and glue another disc magnet in the centre in its place. This is where the magnet's thickness turns out to be spot-on - the two magnets will touch and provide a decent level of attraction, but the mount sits perfectly on the hull and still allows you to rotate the weapons around with ease. Perfect!
Magnetising Eldar walker weapons
This method is identical for Wraithlords, War Walkers and the Guardian Heavy Weapon platform (the plastic one that comes with the Guardian kit - not to be confused with the new plastic Support Weapon platform kit, which uses dry-fitting to allow to you switch between weapons). The weapons for these miniatures have a tab that fits (and is usually glued) into a slot; unlike the skimmer weapons, these have no guard/casings to worry about so you can happily use every single one on the sprue without having to source extra bits.
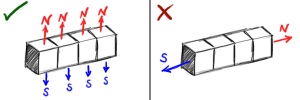
For this method, you'll need to find some really tiny magnets - specifically, cube-shaped magnets that measure just 1mm on an edge. These magnets are the perfect size to fit into the slots on the miniatures. You will need to glue these into the slot (4 will fit quite easily), however it is vitally important to align the magnets properly or they won't work as intended. The magnets need to be glued side-by-side, with the magnetic fields parallel to one another and the same pole of each magnet facing out of the slot. If you let the magnets naturally form a chain their magnetic poles will align and if you were to glue a string of 4 magnets into the slot the magnetic field will be aligned along the length of the slot, not facing out of it. I hope that makes sense - if it doesn't, hopefully Figure 5 will explain it better than I have.
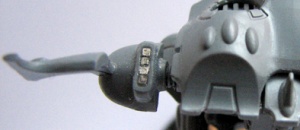
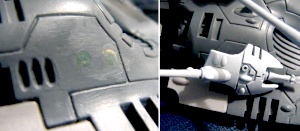
To glue these fiddly magnets into the slot, I use the same technique as for attaching the Falcon magnets - pick up the magnet (on the correct face, which is tricky with such small magnets) using the butt of a needle file. Put a reasonable amount of superglue into the slot, then carefully position the magnet in the slot. Wait a few seconds for the glue to begin to dry, then pull the file away. The magnet should stay in the slot. Repeat this for the remaining three magnets in the slot - bear in mind that this will be harder once there is another magnet already glues in place as the magnets will naturally attract one another when they get close. This may cause the new magnet to try to flip out of the slot before the glue has dried, so be aware of this. Whilst you are doing this, it is a good idea to continually check that the same magnetic pole is facing out of the slot for each magnet. If you've made a mistake it should still be possible (until the last magnet at least) to remove the magnet and try again. Once all four magnets are glued in place, add a fairly thick layer of superglue over the slot and let it dry. This can then be sanded down to give a smooth finish - once the miniature is undercoated the magnets should be invisible. What you're aiming for is something like the example in Figure 6.
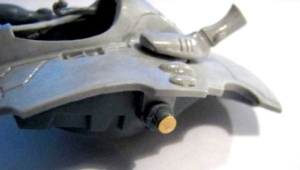
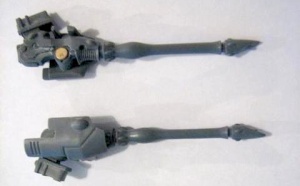
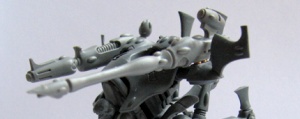
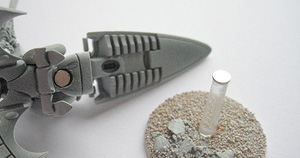
Now for the weapons; they each have a small tab protruding from the base, which fits snugly into the slot. Using a pair of wire clippers or a hobby saw, remove this tab from the weapon. Now simply glue in place two small disc magnets (2mm diameter ones are about the right size) where the tab used to be. You can then use Green Stuff to build up the base of the weapon to conceal the magnets, or alternatively you could drill into the bottom of the weapon and recess the magnets into it. Figure 7 shows a War Walker with an example weapon configuration.
Further uses for magnets
There are a lot of different applications for magnets in the Eldar range (and Games Workshop products in general) and some more of these are outlined briefly below. I've used all of these methods on my own vehicles; in fact, for each fully-equipped Falcon with holofields an admittedly ridiculous total of 30 magnets will have gone into its construction.
Magnetising Falcon turrets
A 6mm-diameter disc magnet is exactly the right size to attach to the bottom of a Falcon turret and fits perfectly into the hole on the upper hull. This allows you to magnetise different Falcon variant turrets so that you can switch between different vehicles without having to purchase (or assemble) several of what is mostly the same kit. I've used this method on Firestorm and Fire Prism/Night Spinner turrets. Depending on the size and weight of the turret, it may be necessary to use a thicker magnet to ensure that the turret is firmly attached (for my Scorpion superheavy grav tank I used a 6mm-thick magnet, for example). You can see the results on a Type II Falcon kit to the right in Figure 8.
Magnetising Wave Serpent turrets
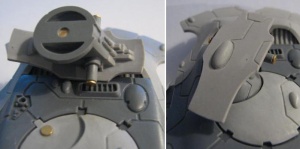
I was never that satisfied with the peg/hole method used to balance the turret on the hull, so I decided to use magnets instead. This is similar to the method for the under-hull shuriken catapults. The 3mm diameter disc magnet is exactly the right size to fit into the hole at the base of the turret. First, cut a strip of plasticard and glue it inside the turret. Then, glue a magnet into the hole. Remove the peg from the round piece that gets glued to the top of the Wave Serpent's hull and glue a magnet in its place. Be careful here - make sure that this magnet is firmly attached to the hull as it is very difficult to retrieve a magnet from inside that hole in the base of the turret if it leaps in there! This method holds the turret in place reasonably firmly but still allows you to rotate it with ease. The end result can be seen in Figure 9 (using a Type II Wave Serpent kit from Forge World).
Magnetic flying bases (grav tanks)
Although the magnets used in the article thus far are very srong for their size, they aren't strong enough to securely hold a whole model kit in place. To that end, I've used larger, rectangular magnets to make my magnetic flying bases. These magnets measure 20mm x 0.5mm x 6mm and are sufficiently powerful to hold a Falcon in place on a flying base (this has also proved successful with the much larger Scorpion superheavy grav tank and my enormous Pegasus scratchbuild project. Each base has been custom-made with a raised plasticard surround around the magnet so that the model can't rotate on the stand whilst it's attached. A removable flying base makes the model easier to transport (no more snapped bases in transit) and also allow the model to be placed on the gaming table to represent it having crashed or landed.
Magnetic flying bases (jetbikess)
A 4x2mm cylindrical magnet gives a good pull and with a little bit of work will fit snugly into the jetbike's flight stand recess. I prefer my jetbikes to hover lower to the ground than the standard flight stand allows, so I have cut mine down sufficiently that a 4x0.5mm disc magnet can be glued securely to the flight stand.
Additional Wraithlord weapons
The small Shuriken Catapults, Flamers and blades/fins that come with the Wraithlord kit can be easily magnetised using the same method as for the larger weapons. I used 2x0.5mm discs for them.
Hull-mounted vehicle upgrades
By recessing small magnets (I used 2mm-diameter discs) into the hull of a vehicle you can then attach vehicle upgrades as necessary. I've done this on all of my Eldar vehicle hulls (the Falcons, Wave Serpents and Eagle) - each has a pair of magnets sunk into each side of the hull near the engines. By attaching magnets to the Eldar Apocalypse upgrade component and the holofield emitters that are sold by Forge World I now have the option of upgrading my vehicles as I see fit. Using Green Stuff its easily possible to disguise the magnets - as can be seen in the left half of Figure 12, the magnets are barely visible even before undercoating.
...and more
For each of my vehicles I've also used magnets to hold the access ramps closed, replace the hinged transparent canopies with fully-removable ones and kept the top hull separate from the bottom so that it can be removed to view the interior. Once you've started experimenting with these fiddly little things you'll find that there are a lot of possibilities available to you.
I hope that this guide proves useful - please let me know if it could be improved in any way or if you have any questions about the methods that I've used. I pretty much made this up as I was going so I'm sure that there are other, better methods out there.
comments powered by Disqus